🐳 Deploying an OCI Container Instance with Ephemeral Public IP Using Terraform — and the Docker Push Trick You Shouldn’t Miss (Refreshed: October 2025)
- Posted by Martin Linxfeld
- Categories Containers, Oracle Cloud Infrastructure (OCI), serverless, terraform
- Date May 5, 2023
- Comments 0 comment
- Tags docker, Ephemeral Public IP, Image Push, OCI Container Instance, OCI Container Instance Terraform, ocir, Oracle Resource Manager, Push Docker image to OCIR, terraform, Vault
This guide focuses on OCI Container Instance Terraform deployment — showing how to combine ephemeral public IPs with Docker image push to OCIR for a fully automated setup. In this tutorial, we’ll walk through deploying an OCI Container Instance with an ephemeral public IP using Terraform (or Oracle Resource Manager).
But here’s the real trick 👇
Before your container can run in OCI, you need to build your Docker image locally and push it to OCIR — fully automated as part of your Terraform plan.
When working with OCI Container Instance Terraform setups, pushing images to OCIR is often the missing step that trips people up.
This post is part of a hands-on journey inside FoggyKitchen’s Terraform training. At the end, you’ll find a link to explore the full course.
🌐 What We’re Building
A private container repo in OCIR.
A Docker build & push pipeline triggered by Terraform (
null_resource + local-exec).A Container Instance running the pushed image, exposed through ephemeral public IP.
Optional SSL volume mount and environment variables.
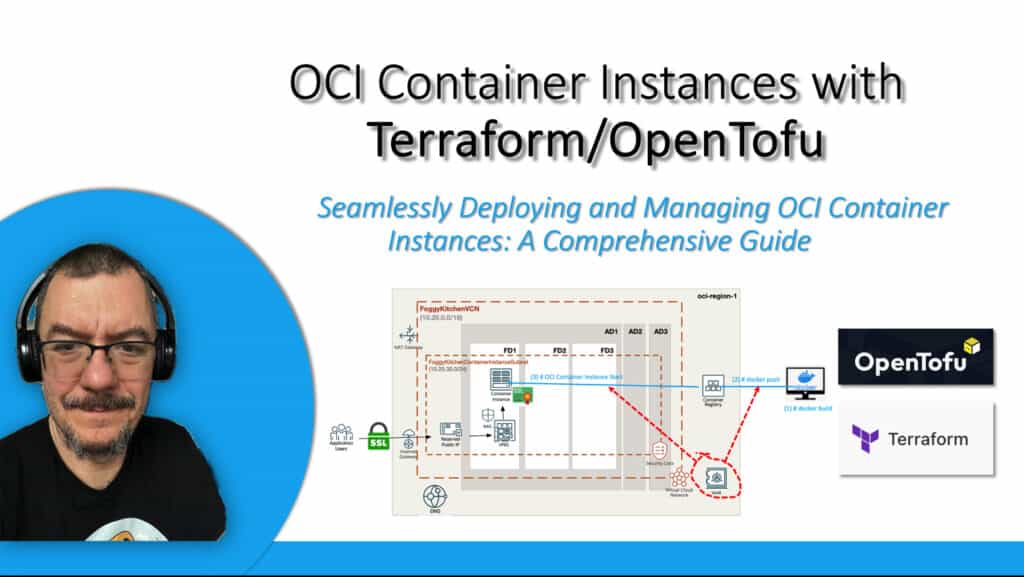
This architecture is lightweight, perfect for labs, demos, or as a building block for larger OCI deployments.
Figure 1. Container Instance architecture with ephemeral public IP.
🧱 Step 1: Build & Push to OCIR (The Trick)
Before the Container Instance can pull an image, you need to build and push the image to your private OCIR repo. This is done entirely within Terraform using a null_resource block.
resource "oci_artifacts_container_repository" "FoggyKitchenArtifactsContainerRepository" {
  provider       = oci.targetregion
  compartment_id = oci_identity_compartment.FoggyKitchenCompartment.id
  display_name   = "${var.ocir_repo_name}/fknginx"
  is_public      = false
}

resource "null_resource" "deploy_to_ocir" {
  depends_on = [oci_artifacts_container_repository.FoggyKitchenArtifactsContainerRepository]

  # 1) Login to OCIR
  provisioner "local-exec" {
    command = "echo '${local.ocir_user_password}' | docker login ${local.ocir_docker_repository} --username ${local.ocir_user_name} --password-stdin"
  }

  # 2) Clean old images
  provisioner "local-exec" {
    command = "image=$(docker images | grep fknginx | awk -F ' ' '{print $3}') ; docker rmi -f $image &> /dev/null || true"
  }

  # 3) Build the image
  provisioner "local-exec" {
    command = "docker build -f docker/Dockerfile${local.enable_ssl} --build-arg NGINX_PORT=${var.nginx_port} --build-arg NGINX_SSL_PORT=${var.nginx_ssl_port} --build-arg HOST_NAME=${var.dns_domain} -t fknginx ."
  }

  # 4) Tag & push to OCIR
  provisioner "local-exec" {
    command = "image=$(docker images | grep fknginx | awk -F ' ' '{print $3}') ; docker tag $image ${local.ocir_docker_repository}/${local.ocir_namespace}/${var.ocir_repo_name}/fknginx:latest"
  }

  provisioner "local-exec" {
    command = "docker push ${local.ocir_docker_repository}/${local.ocir_namespace}/${var.ocir_repo_name}/fknginx:latest"
  }

  # 5) Optional cleanup
  provisioner "local-exec" {
    when    = destroy
    command = "image=$(docker images | grep fknginx | awk -F ' ' '{print $3}') ; docker rmi -f $image &> /dev/null || true"
  }
}
🔑 Requirements
Docker installed on the machine running
terraform apply.OCIR auth token (not your console password!) for login.
Namespace, region, repo variables configured.
IAM policies allowing Container Instances to pull images from OCIR.
🐳 Step 2: Provision the Container Instance
Once the image is pushed, the Container Instance can reference it via image_url. Here’s the core Terraform snippet:
resource "oci_container_instances_container_instance" "FoggyKitchenContainerInstance" {
  depends_on          = [null_resource.deploy_to_ocir, oci_identity_policy.FoggyKitchenContainerInstancesVaultPolicy]
  provider            = oci.targetregion
  compartment_id      = oci_identity_compartment.FoggyKitchenCompartment.id
  availability_domain = var.availablity_domain_name == "" ? data.oci_identity_availability_domains.ADs.availability_domains[0]["name"] : var.availablity_domain_name

  image_pull_secrets {
    registry_endpoint = "${local.ocir_docker_repository}/${local.ocir_namespace}/${var.ocir_repo_name}/"
    secret_type       = var.enable_vault ? "VAULT" : "BASIC"
    username          = var.enable_vault ? null : base64encode("${local.ocir_namespace}/${var.ocir_user_name}")
    password          = var.enable_vault ? null : base64encode(var.ocir_user_password)
    secret_id         = var.enable_vault ? var.vault_secret_id : null
  }

  containers {
    image_url    = "${local.ocir_docker_repository}/${local.ocir_namespace}/${var.ocir_repo_name}/fknginx:latest"
    display_name = "FoggyKitchenContainerInstance"
    environment_variables = local.environment_variables
  }

  shape = var.container_instance_shape

  shape_config {
    memory_in_gbs = var.container_instance_shape_memory
    ocpus         = var.container_instance_shape_ocpus
  }

  vnics {
    subnet_id             = oci_core_subnet.FoggyKitchenContainerInstanceSubnet.id
    is_public_ip_assigned = var.enable_ephemeral_public_ip
    nsg_ids               = var.enable_nsg ? [oci_core_network_security_group.FoggyKitchenWebSecurityGroup[0].id] : []
  }

  display_name = "FoggyKitchenContainerInstance"
  state        = "ACTIVE"
}
The key is is_public_ip_assigned = var.enable_ephemeral_public_ip.
This assigns a temporary IP that’s ideal for quick testing.
This is a lightweight OCI Container Instance Terraform configuration that you can extend for production-grade workloads.
🚀 Quick Start
1. Clone the repo:
git clone https://github.com/mlinxfeld/terraform-oci-container-instance
cd terraform-oci-container-instance
2. Configure variables & auth
OCIR namespace, repo name, auth token, compartment, etc.
3. Run Terraform:
terraform init
terraform apply
4. Test the endpoint:
curl -I http://EPHEMERAL_PUBLIC_IP/
5. Clean up:
terraform destroy
🛡️ Security & Production Tips
Prefer Vault secrets for OCIR authentication in
image_pull_secrets.Add NSG rules to restrict inbound access (e.g., 80/443 from specific IPs).
In production, offload build & push to OCI DevOps or GitHub Actions — not local-exec.
Use versioned image tags, not
:latest, for immutability.
🔗 Related Post
Want to see the same OCIR push trick applied to Kubernetes (OKE)?
👉 OCI OKE + OCIR + Terraform: Build, Push, Deploy
Both workflows share the same building block — pushing to OCIR from Terraform — making it easy to graduate from single Container Instances to fully orchestrated OKE clusters.
🧠 Ready to Go Deeper?
This tutorial is just a teaser. In our OCI Container Instances with Terraform (2023 Edition) course, we dive much deeper.
You’ll learn how to:
- Learn how OCI Container Instances work
- Deploy containerized apps using Docker images
- Set up networking (VCNs, subnets, security lists)
- Configure DNS and SSL certificates for HTTPS access
- Integrate everything with OCI IAM for access control
- Automate the entire workflow using Terraform
👉 Enroll now and master Container Instances end-to-end in OCI.
👉 Master OCI Container Instances with Terraform
Hands-on course covering OCIR, networking, SSL, DNS, IAM integration, and full automation — everything you need to deploy containerized apps on OCI like a pro.
🔒 Lifetime • ⏱️ Self-paced • 🧪 Real labs