🚀 How to Create Your First OCI Resource Manager Stack (Step-by-Step)
- Posted by Martin Linxfeld
- Categories oci, resource manager, terraform, training, tutorial
- Date May 29, 2024
- Comments 0 comment
- Tags cloud automation oci, create oci stack, oci resource manager, Oracle Cloud Infrastructure, plan and apply terraform, terraform automation, terraform tutorial
Oracle Cloud Infrastructure (OCI) Resource Manager is a built-in Terraform-as-a-Service solution. Instead of maintaining your own Terraform server, you can simply upload configuration files and run jobs directly in the OCI Console.
In this guide, I’ll walk you through a real example: creating a simple stack from a .zip archive that contains Terraform code.
Step 1 – Open Resource Manager in OCI Console
To start building stacks in Oracle Cloud Infrastructure (OCI), we first need to open the Resource Manager service in the OCI Console. This is where all the automation with Terraform-as-a-Service begins.
Why this step matters:
Resource Manager is the central place for managing Terraform configurations in OCI. Instead of setting up your own Terraform CLI environment, you can upload configurations, run jobs, and track logs directly in the console.
Follow these sub-steps:
Log in to the OCI Console.
From the left-hand menu, navigate to:
Developer Services → Resource Manager → Stacks.The Stacks page will open, allowing you to create or manage existing Terraform stacks.
💡 Tip: If you’re new to OCI, the Developer Services menu groups together tools like DevOps, Functions, and Resource Manager. Bookmark this path for quicker access later.

Figure 1. Navigation path to Resource Manager → Stacks in the OCI Console.
Step 2 – Create a new stack from a .zip file
To actually deploy resources with Resource Manager, we need to create a new stack. A stack is a logical container that holds Terraform configuration files, variables, and state information.
Why this step matters:
Creating a stack from a .zip archive allows you to package and upload Terraform configurations directly from your local environment. This is the easiest way to get started, as it avoids the need for GitHub integration or Resource Discovery.
Follow these sub-steps:
In the Stacks page, click Create Stack.
Under Terraform configuration source, select Zip File.
Upload the prepared archive (in this example:
LESSON1_single_webserver.zip).Provide a descriptive stack name (e.g., FoggyKitchen Webserver) to make identification easier later.
💡 Tip: Always keep your .zip archive clean – only include the .tf files, variables.tf, and outputs.tf needed for deployment. Unnecessary files may cause validation errors.
Figure 2. Creating a new stack from a .zip archive in OCI Resource Manager.
Step 3 – Explore the code in OCI Code Editor
Once the stack is created, Resource Manager automatically unpacks the uploaded .zip archive and makes the Terraform files available in the OCI Code Editor. This integrated editor allows you to browse, review, and modify your Terraform configuration directly in the cloud console.
Why this step matters:
Being able to edit Terraform code without leaving the console is extremely useful for quick fixes or adjustments. Instead of having to repackage and re-upload your .zip archive, you can update variables, change resource properties, or add outputs on the spot.
Follow these sub-steps:
After the stack is created, click Code Editor from the Resource Manager panel.
Navigate through the file tree on the left – here you’ll find
provider.tf,variables.tf,outputs.tf, and other files you included in your archive.Open compute.tf and review the resource definition. In this example, the file provisions a flexible-shape VM in the
FoggyKitchenWebSubnet.Make any necessary edits (e.g., adjusting
ocpus,memory_in_gbs, ordisplay_name).Save your changes – these will be applied in the next Terraform Plan / Apply run.
💡 Tip: Even though editing directly in the console is convenient, for larger projects it’s best practice to manage your code in version control (e.g., GitHub) and connect Resource Manager to the repository.

Figure 3. Browsing and editing Terraform files (compute.tf) in the built-in OCI Code Editor.
Step 4 – Run a Plan job
With the stack prepared, the next step is to validate the Terraform configuration by running a Plan job in OCI Resource Manager. A Plan job performs a dry run of your deployment: it evaluates the code, checks for syntax issues, and shows which resources would be created, modified, or destroyed—without actually provisioning anything yet.
Why this step matters:
Running a Plan job gives you confidence before applying real changes to your cloud environment. You can detect errors early, verify that the configuration matches your intent, and avoid accidental changes in production.
Follow these sub-steps:
From the stack details page, click Run Plan.
Confirm the default options and start the job.
Watch the logs in real time. Resource Manager will fetch providers, initialize modules, and display the list of planned actions.
Once the Plan job completes, review the output carefully. You should see a summary of actions like “1 to add, 0 to change, 0 to destroy”.
💡 Tip: If the Plan output doesn’t look right, go back to the Code Editor to adjust your Terraform files before proceeding. This iterative workflow saves time and prevents costly mistakes.
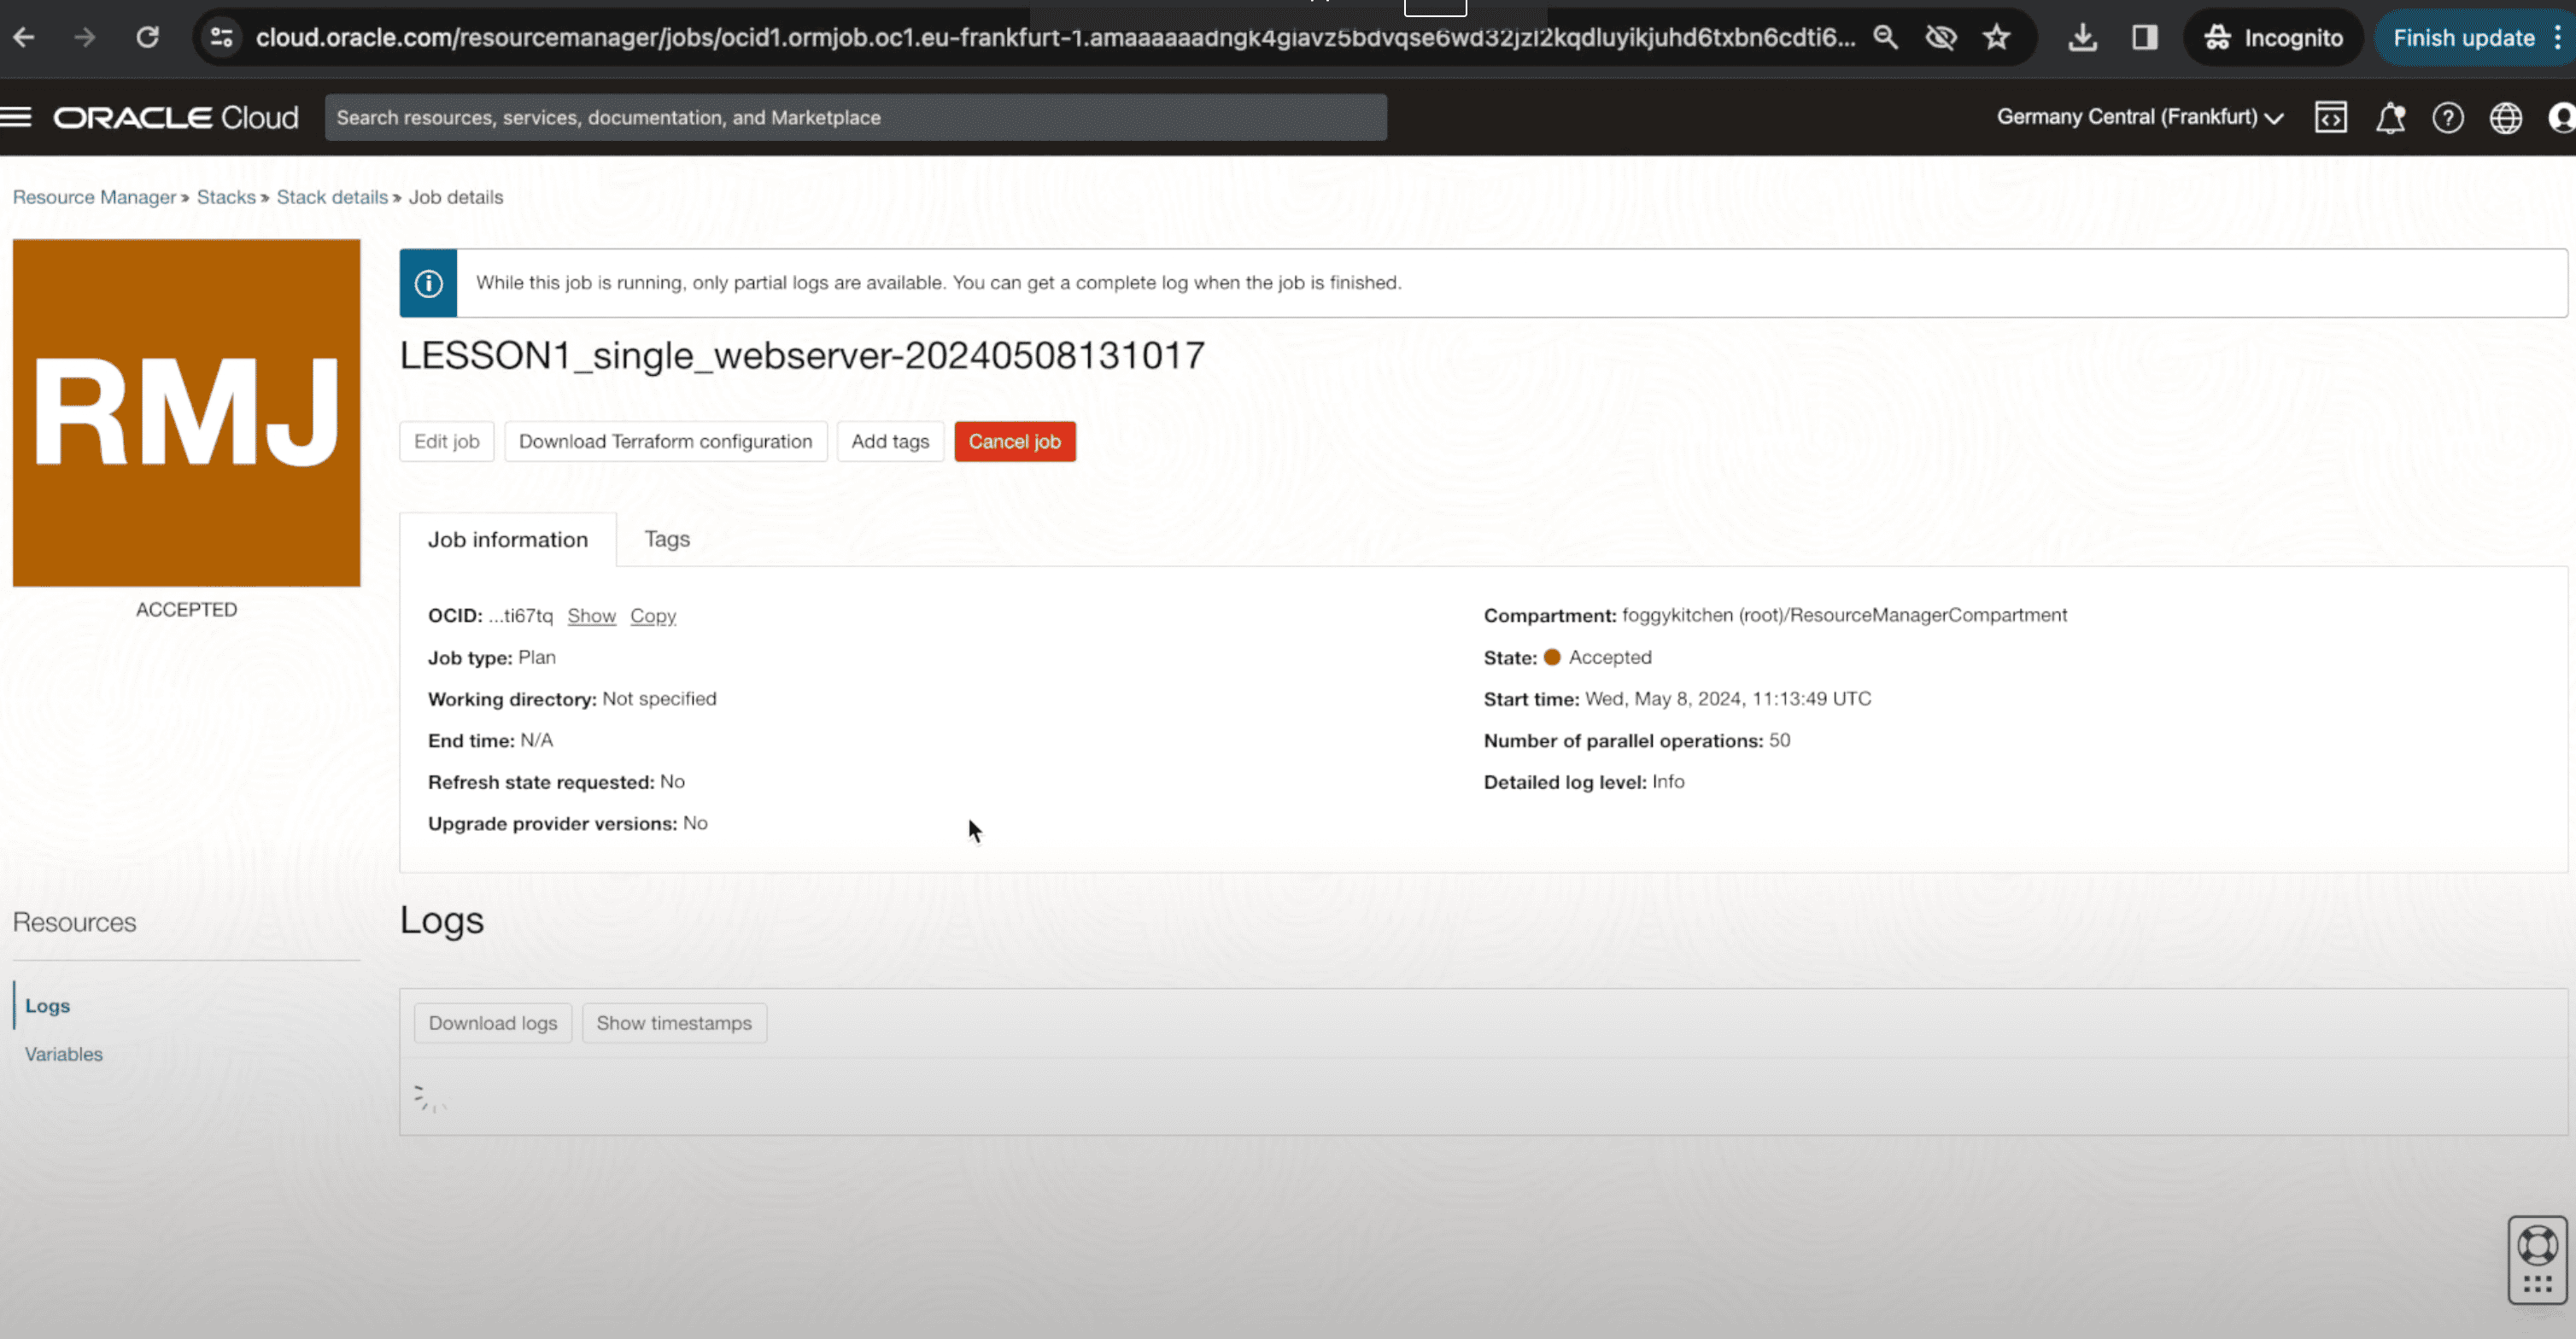
Figure 4. Example of a Resource Manager Plan job running in the OCI Console, showing logs and status updates.
Step 5 – Apply and provision infrastructure
Once the Plan job has been reviewed and confirmed, it’s time to actually create the infrastructure by running an Apply job. This step provisions the resources described in your Terraform configuration and makes them live in Oracle Cloud Infrastructure.
Why this step matters:
The Apply job is where your code becomes reality. It provisions VCNs, subnets, compute instances, or whatever you’ve defined in the stack. Running Apply after a successful Plan ensures that you deploy only the changes you have already validated.
Follow these sub-steps:
From the stack details page, click Run Apply.
Confirm the job settings and start the execution.
Watch the logs as Resource Manager initializes providers, creates networking resources, and spins up your compute instance.
When the job reaches a SUCCEEDED state, your infrastructure is provisioned and ready to use.
Verify the resources in the OCI Console—for example, check that your VCN and subnet are available, and confirm that the compute instance is running in the expected compartment.
💡 Tip: For production environments, always run Apply jobs with version-controlled code and consider enabling drift detection. This ensures consistency and reduces the risk of configuration drift over time.
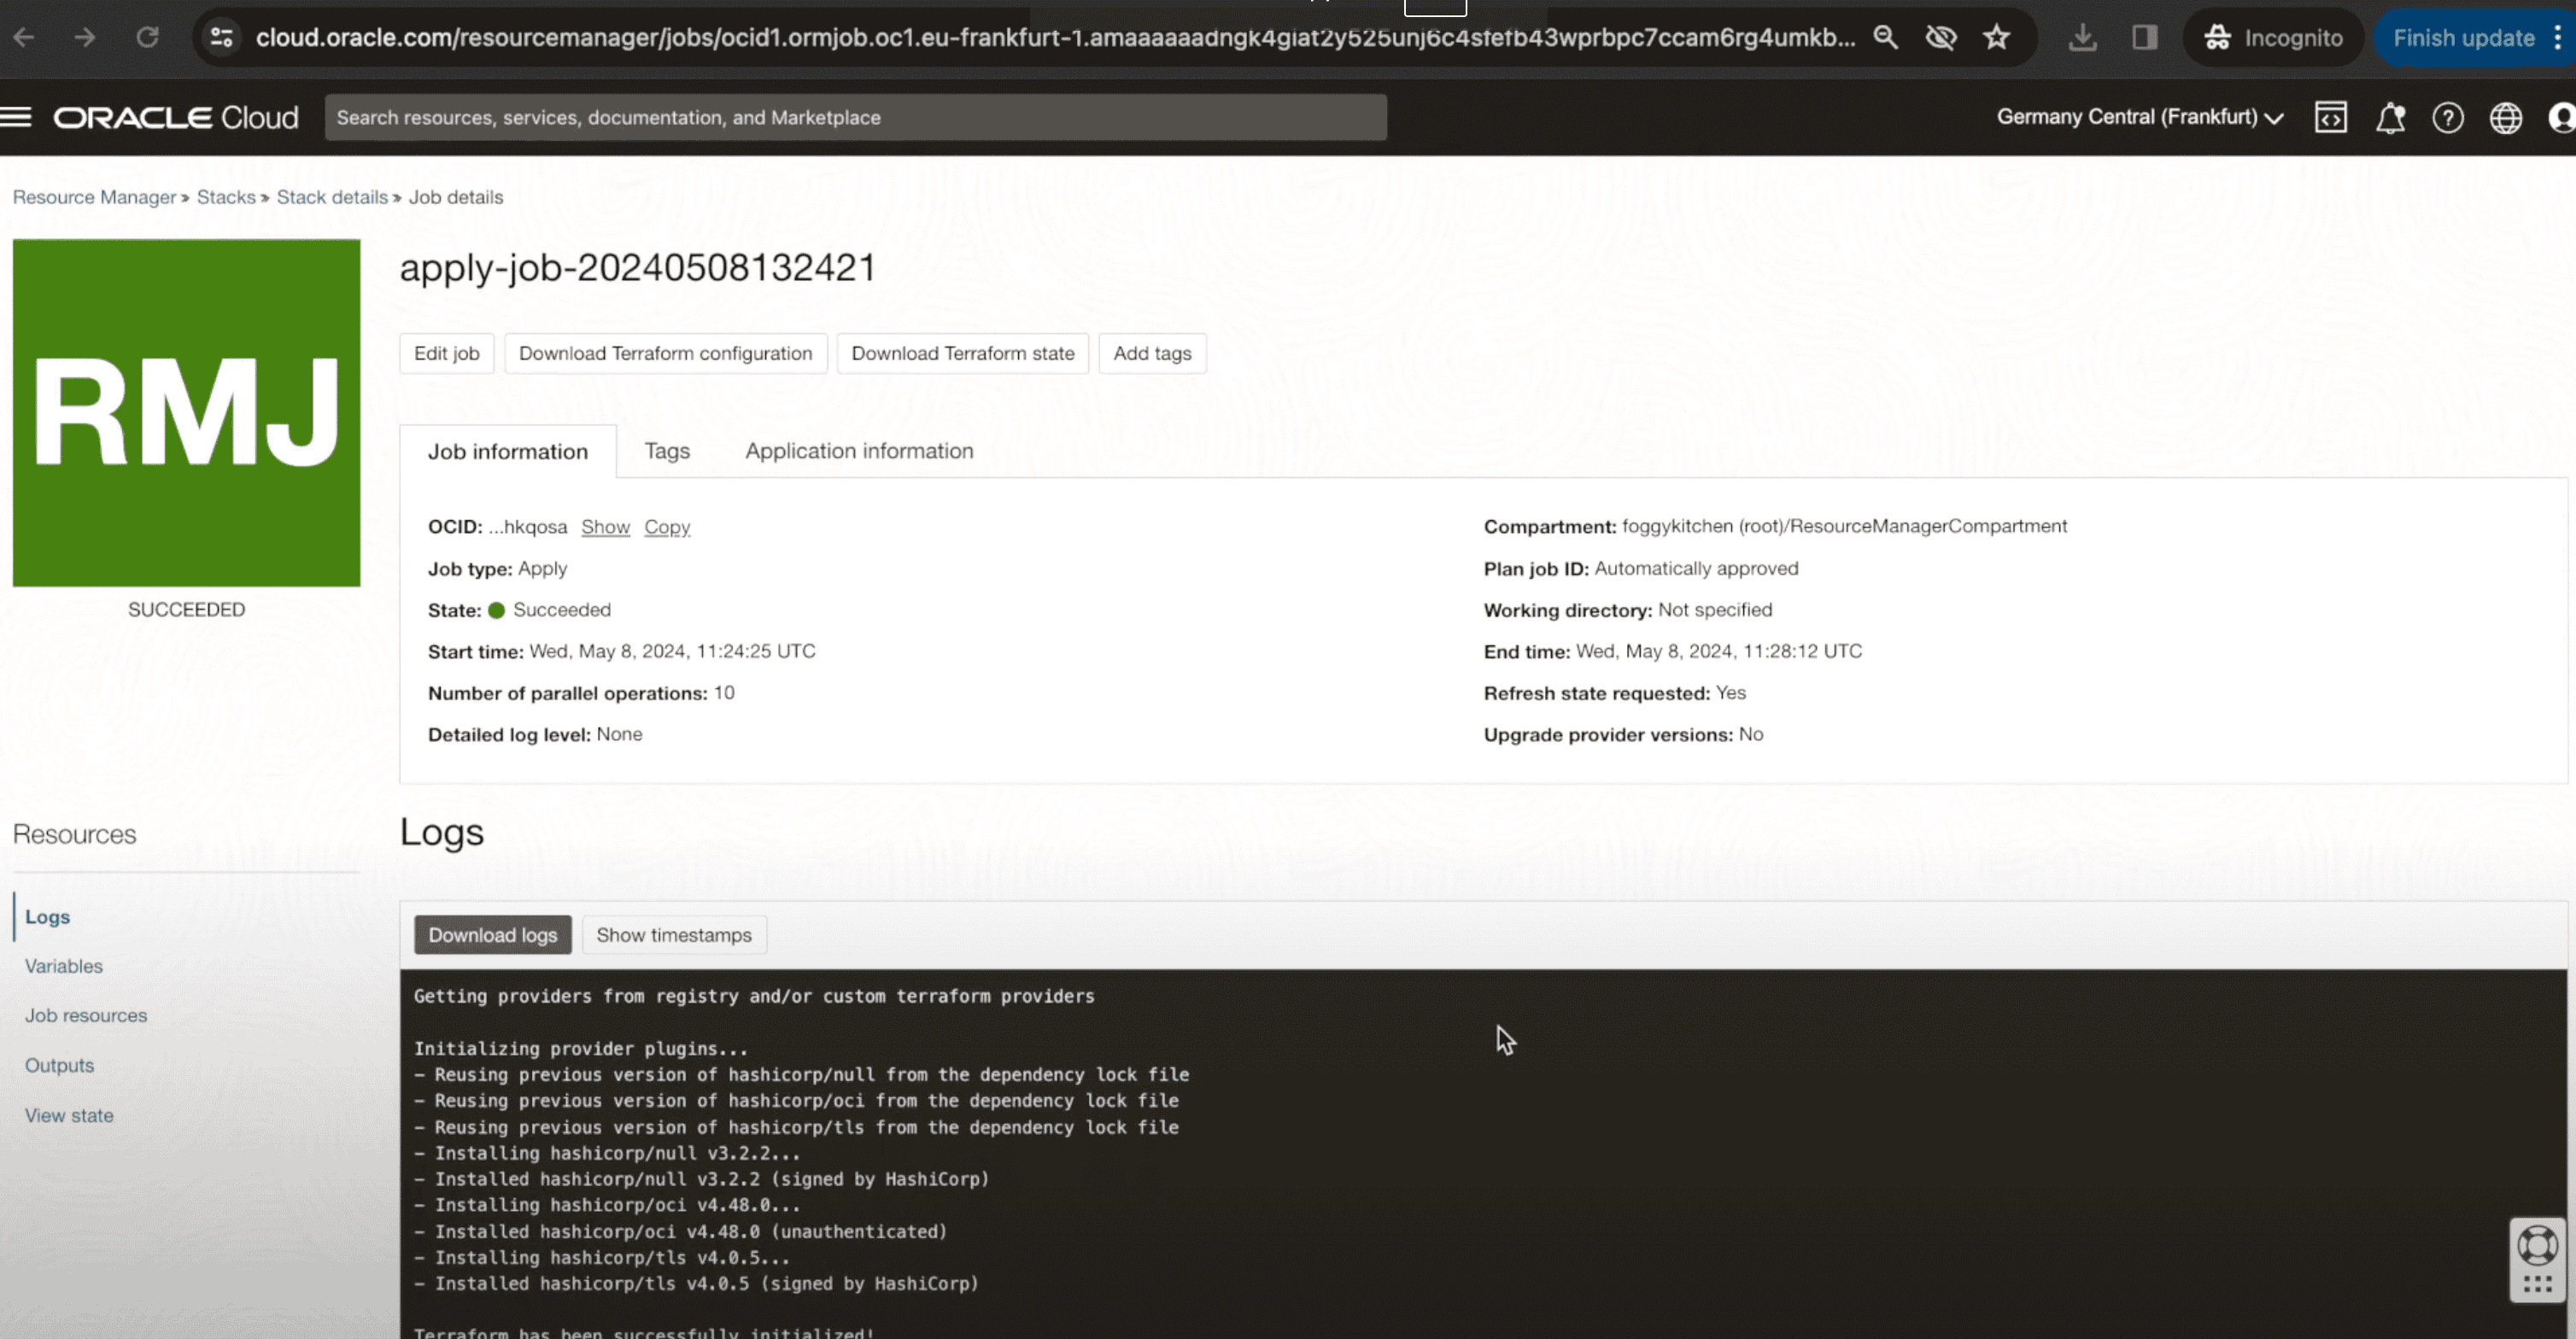
Figure 5. Example of an Apply job completing successfully in OCI Resource Manager, provisioning a VCN, subnet, and compute instance.
Step 6 – Verify created resources
After the Apply job has succeeded, the final step is to confirm that the infrastructure was provisioned as expected in the Oracle Cloud Infrastructure (OCI) Console. This verification ensures that your Terraform configuration has been correctly applied and that all resources are active and usable.
Why this step matters:
It’s one thing to run Terraform code, but another to validate that the infrastructure matches your intentions. Verifying resources helps you catch misconfigurations early—for example, wrong CIDR blocks, missing subnets, or incorrect shapes for compute instances.
Follow these sub-steps:
Navigate to the Networking → Virtual Cloud Networks (VCN) section in the OCI Console.
Confirm that the FoggyKitchenVCN has been created with the correct CIDR block (10.0.0.0/16 in this example).
Open the Subnets tab and check that the
FoggyKitchenWebSubnetis available and configured as expected.Optionally, check the Compute → Instances page to ensure that your web server instance is running inside the created subnet.
Validate connectivity by SSH or HTTP if your configuration exposed network access.
💡 Tip: At this stage, it’s good practice to record the created resources (OCIDs, subnet details, instance IPs) in your documentation or version control system. This makes troubleshooting and future iterations easier.
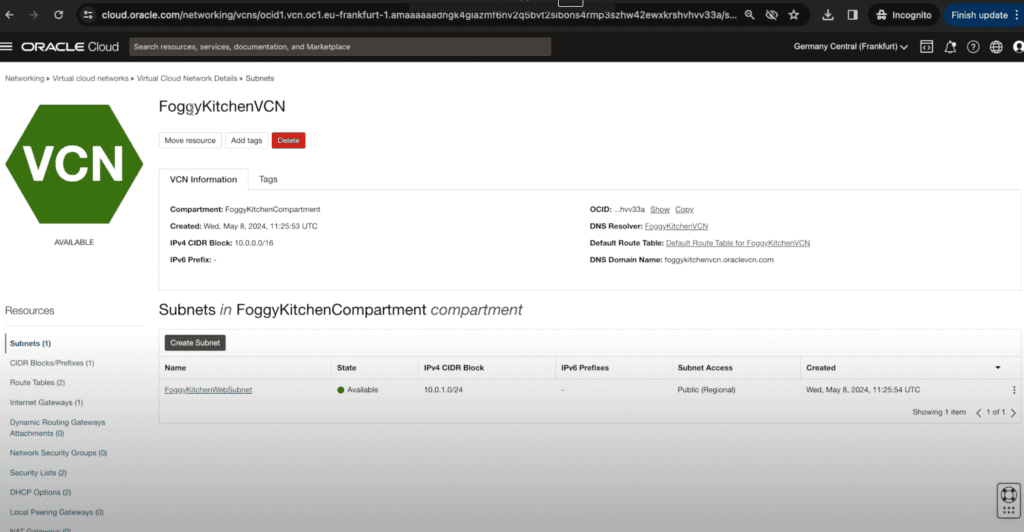
Figure 6. Verification of the created VCN and subnet (FoggyKitchenVCN and FoggyKitchenWebSubnet) in the OCI Console.
🎯 Wrapping Up
In a few minutes, you’ve deployed a complete Terraform stack in OCI without installing CLI tools or managing backend state.
👉 In the full course, you’ll also learn how to:
Create stacks from private GitHub repositories,
Use Resource Discovery,
Detect configuration drift.
📌 Check it out here:
OCI Resource Manager Fundamentals (2024 Edition)

🚀 Take Your OCI Skills Further
Learn the full workflow with the OCI Resource Manager Fundamentals course — from creating and uploading stacks, integrating with GitHub repositories, and editing code directly in the OCI Console, all the way to Resource Discovery and Drift Detection. This step-by-step training equips you with practical, production-ready skills to manage your OCI environments with confidence.
🔒 Lifetime • ⏱️ Self-paced • 🧪 Real labs